By Emily · May 2026 · 8 min read
Whether you're a complete beginner or you've had your Glowforge for years, making a wooden tealight candle holder is one of the most satisfying — and surprisingly quick — projects you can do. This guide walks you through everything: choosing your SVG file, picking the right wood, dialing in your settings, and assembling the final piece.
Why Wooden Candle Holders?
Wooden tealight holders are a perennial bestseller at craft fairs and on Etsy — and for good reason. They're quick to cut (most designs take under 10 minutes on a Glowforge), require very little material, and the warm glow of candlelight through engraved wood looks absolutely stunning. They also make incredible personalized gifts. Beyond the aesthetic appeal, they're perfect practice pieces if you're just getting started with laser cutting. Simple geometry, clear assembly, and instant gratification.
Quick Tip: Candle holders are also a great way to test your Glowforge's settings on a new wood type — the small size means you waste very little material if you need to tweak speed or power.
What You'll Need
Before you fire up the laser, gather your materials:
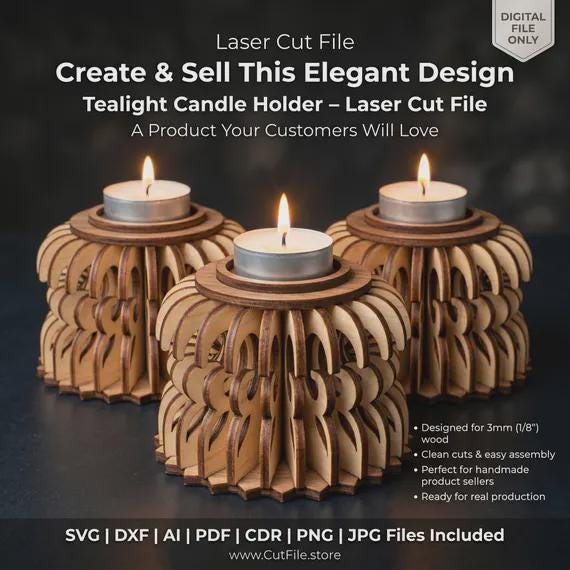
- SVG or DXF laser cut file for your candle holder design.
- 3mm (⅛") Baltic birch or basswood plywood — the most popular choice.
- Glowforge (Plus, Pro, or Aura all work great).
- Wood glue (Titebond or similar).
Optional: wood stain, Danish oil, or spray sealant for finishing.
Step-by-Step: From File to Finished Holder
Step 1 — Download (or Design) Your SVG File
The easiest way to start is with a ready-made SVG or DXF file. Look for designs that are specifically sized for 3mm plywood and labeled "Glowforge ready." Quality files will include all the cut lines and score lines already separated on different layers — so you don't need to do any prep work in Inkscape or Illustrator. Our Tealight SVG Laser Cut Files at CutFile.store are designed exactly this way — just open, confirm your material thickness, and cut.
Step 2 — Open the File in the Glowforge App
Upload your SVG file to app.glowforge.com. The Glowforge app will automatically detect cut lines (usually in blue or red) and score lines (usually dashed). Assign the correct operations to each layer: Cut for outer profiles, Score for engraved details, and Engrave for filled areas if applicable.
Step 3 — Set Your Material & Dial In Settings
Place your wood on the Glowforge bed. If you're using Proofgrade material from Glowforge, select it from the drop-down and the settings are automatic. For non-Proofgrade Baltic birch or basswood, use these manual settings as a starting point:
Cut (3mm birch) — Speed: 168 / Power: Full / Passes: 1
Score — Speed: 300 / Power: 35 / Passes: 1
Engrave (light) — Speed: 1000 / Power: 30 / Passes: 1
Always do a test cut on a small scrap piece first — wood varies by supplier and humidity.
Step 4 — Cut & Remove the Pieces
Run the job. Once finished, wait a full minute before opening the lid to let any smoke clear. Carefully pop the cut pieces out of the sheet — most tab-and-slot designs come out cleanly. Use a soft toothbrush to brush away any soot from the cut edges (this prevents dark fingerprints on your finished piece).
Step 5 — Sand & Finish (Optional but Recommended)
A quick sand with 220-grit on the flat surfaces makes a huge difference in how professional the finished piece feels. For a warm amber tone that enhances the wood grain, apply a thin coat of Danish oil or Tung oil with a cloth. Let it cure for 2–4 hours before assembly.
Step 6 — Assemble with Wood Glue
Dry-fit all the pieces first without glue to make sure everything aligns. Then apply a thin line of wood glue to the tab-and-slot joints and press together. Use painter's tape to hold the sides while the glue sets — about 30 minutes for a workable bond, 24 hours for a full cure.
Pro Tips for Better Results
Use masking tape on your wood
Before cutting, apply blue painter's tape or transfer tape to both sides of your plywood. This protects the surface from smoke residue and makes the laser-cut pieces look much cleaner right out of the machine.
Check the kerf
"Kerf" is the tiny amount of material the laser removes as it cuts — typically 0.1–0.2mm for a Glowforge on 3mm plywood. If your tabs feel loose when assembling, your SVG file may not account for kerf. Quality files from dedicated laser cutting shops are usually already kerf-corrected.
Never leave it unattended
This goes without saying, but always supervise your Glowforge while it's running — especially when cutting wood. The built-in camera makes it easy to keep an eye on the job from your phone.
Safety Note: Only use tealight candles (they stay cool) or battery-operated LED tealights in your wooden holder. Never use open-flame candles that could heat the wood for extended periods.
Frequently Asked Questions
What SVG file format does Glowforge use?
Glowforge works with SVG files natively, as well as PNG, JPG, and PDF. For precise cut files, SVG is always the best choice — it's a vector format so your paths stay perfectly sharp at any size. DXF files can be imported too, but SVG gives you the most control inside the Glowforge app.
What's the best plywood for a tealight holder?
3mm Baltic birch is the gold standard for decorative laser cut projects. It's consistent, has a fine grain, cuts cleanly, and takes stain beautifully. Basswood is a softer, lighter alternative that engraves with higher contrast. Avoid MDF for candle holders — it absorbs moisture and isn't ideal near heat sources.
Can a Glowforge Aura cut 3mm plywood?
Yes! The Glowforge Aura (the entry-level model) can cut 3mm Baltic birch — it may require slightly slower speeds compared to the Plus or Pro, but the results are just as beautiful. The key is using clean, consistent plywood without voids.
Do I need Inkscape to use these SVG files?
Not at all. Our files are designed to be drag-and-drop ready in the Glowforge app — no software required. If you want to resize or customize a design, free tools like Inkscape or Vectornator work great.
Ready to try it? Browse our Glowforge-ready candle holder SVG files at CutFile.store — all kerf-corrected, tested, and ready to cut.